Exciting news! Our ConnectBooster Support documentation is moving to a new location. Be sure to bookmark the new link below.
This section allows you to enable and customize the system emails that are sent to your organizations.
The address/contact information in the email footer is automatically filled from your General Settings + Basic Information.
Client Emails are grouped into four sub-categories:
- Transaction Receipts
- Portal Access
- Account Notifications
- Invoice Past Due Notices
Transaction Receipts
Transaction emails are on by default and cannot be turned off, nor do they have a built in "Exclusions" list.
They include:
- Success
- Failed
- Scheduled
- Rescheduled
- Cancelled
- Payment Method Failure

We automatically send these type of notices to a company's "Default Notification Contacts" (indicated by the star). ![]()
Default Notification Contacts are set manually, automatically derived from your integrated CRM, or the primary contact email from your accounting software.
Portal Access
These emails can sent on demand from an individual organization’s profile/contact, or in some cases by request when a user asks to reset their password. The "Mass Send Welcome" is intended to help organizations with large datasets, wishing to "roll-out" the billing portal in a bulk fashion.
Welcome Email
The welcome email is an invitation email for new users. This is the email you will send to new users of the portal which includes a link to create their account. It can be done one-by-one with the contact and email of your choosing by going to the "Organization Details" page. After 24 hours, the link expires and a new welcome email will need to be sent.
Mass Send Welcome Email
This is useful when giving portal access in bulk, to many organizations. A few preparatory steps should be taken first before using this feature, as a contact and email address must exist, along with a matching Client Profile. If you need to setup Client Profiles in bulk, please review the "Mass Update Default Contact Profiles" section.
The "Mass Welcome" email should only be used after "hiding" unwanted company "types" or "statuses" to help prevent going to unwanted companies! More information can be found on the Provider Settings article.
Once you have taken the precautionary steps, simply select the "Profile" that this should be sent to.
You may exclude clients that have already logged in or who have already been sent this email in the past.
Password Reset
Sent when a user makes a password reset request. The link to password reset link expires after 24 hours.
Account Notifications
Payment Method Expiration
Enable this notify any client that has a card is about to expire a month prior, and once a week that is has already. Note: this email will still send to former/inactive clients until the card it deleted from the system.
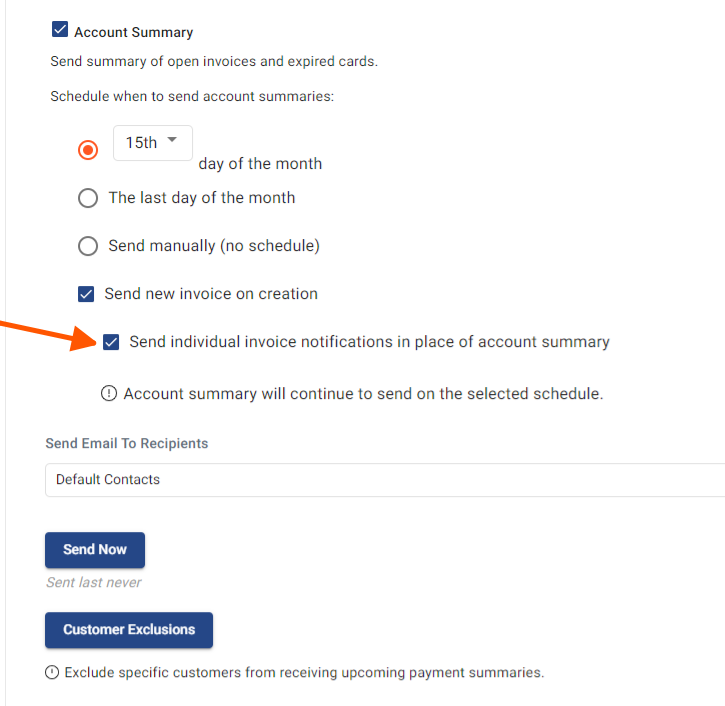
Account Summary
 The Account Summary allows you to send clients a recurring "friendly" type email of all open invoices in the system (at the time of sending). This also include any expired credit cards on file. It is not intended to be a "collections" type email, but rather a reminder of what is open and due.
By default the Account Summary email is disabled.
Turning this on requires the following steps:
- Enable the Account Summary by selecting the checkbox
- Choose your Schedule. Options include:
- The X day of the month. Use the drop-down to pick 1 - 28.
- The last day of a given month
Send manually (no schedule) - Means the summary is not sent on a schedule, but can be sent either on demand by choosing the Send Now button (for all clients with open invoices), one-by-one via a client's "Organization Details" page or enabling the Send on new invoice creation option.
Send on new invoice creation - Choosing this option will send the Account Summary when new invoices are synced into ConnectBooster. This setting is independent of the other schedule options. Enabling this function reveals the "Send individual invoice notifications in place of Account Summary" option. Use this if you prefer ConnectBooster to send individual invoice notifications when new invoices are synced.
3. Choose the Recipients. Most commonly you will want to leave this at "Default Contacts", which may already be determined by your CRM. This is indicated by the  on a contact within the "Organization Details" page. In special circumstances, you may only want to send these notices to a particular subset of clients determined by their "Client Profile" permissions.
4. Save
Please see the "Pay Now" article for more information on adding the "Pay" option on each invoice line!
Invoice Notification
This invoice delivery email is ONLY enabled by selecting the "Send individual invoice notifications in place of Account Summary" option above.

Individual invoice emails will be sent when a new invoice synchronizes into the system, or on demand (when viewing an invoice and selecting "Email" --> "Email Invoice").
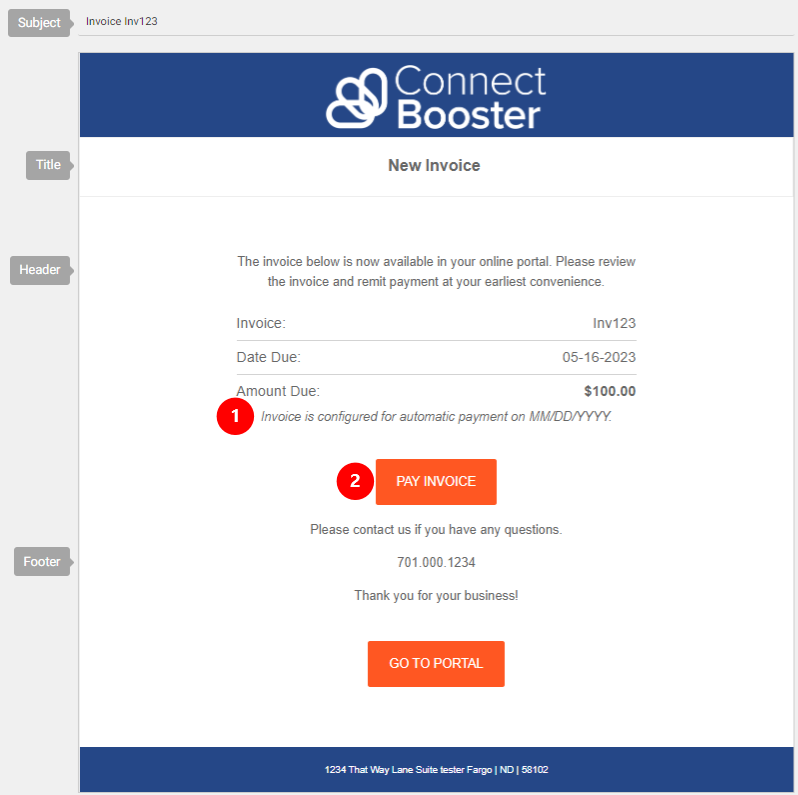
1. "Display calendar date trigger..." this setting toggles if the additional text is displayed for AutoPay eligible invoices at the time of sending.
2. Behavior of the "PAY INVOICE" button is dependent if Pay Now is enabled.
Behavior:
A given client will receive 1 email for EACH new invoice that synchronizes into the system. You may not want this if you are already sending new invoice delivery type emails from your CRM.
This delivery email is required if you want a client to select the "Pay Invoice" button, and pay without login. Please see the "Pay Now" article for more information! If Pay Now is not enabled, the button will simply link to your portal login page.
Both scenarios will use the Invoice Notification email template.
Tip: Do NOT turn this feature on until you are actually prepared for email notifications to start sending out!
Upcoming Payments Summary
The Upcoming Payments Summary email allows you to notify organizations of their upcoming AutoPay or scheduled payments. This is intended to be a preemptive type email, to help remind clients their invoice is about to pay. This is useful if clients typically receive their invoice a month or more in advance, and would like a heads up before the payment actually triggers.
- Enable Upcoming Payments Summary
- Set the number of days prior to the next payment to send the email
- Save
The email will send to a company's Default Contacts  , and honor any organizations on the Customer Exclusions.

Invoice Due Notices
This powerful email automation section can behave in two different ways. Before processing, think if you most prefer "reactive", "proactive" or "both" communication styles for your business needs.

Alert organizations BEFORE an Invoice becomes Past Due.
- A default of "5" days Before is already created. Choose Add Due Notice to specify a custom number of days before an Invoice Due Date.
- Select BEFORE.
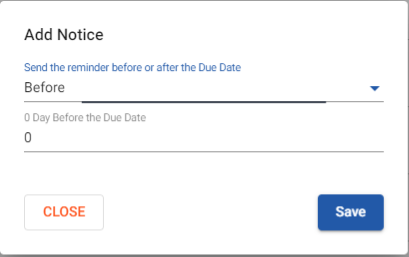
- Define the # of days, and Save. Be sure to ENABLE the newly generated template.
- Note: ConnectBooster can not notify a client about an invoice if it's not in the system. Please be mindful if your typical invoicing schedule does not allow you to leverage this function.

Alert organizations AFTER an Invoice has entered a Past Due status.
After the specified number of days have passed after an Invoice Due Date, this function will send 1 email per each invoice that meets your selected criteria. I.e., if a client has 5 separate Past Due invoices that meet your triggers, the client will receive 5 emails.
- Check the notices you wish to be sent out (Example: 15, 30, 45, 60, 90 days defaults) or choose Add Due Notice to specify a custom number of days after an Invoice Due Date.
- Select AFTER
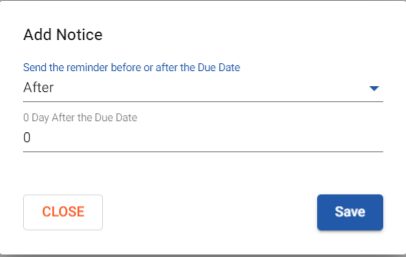
- Save

This setting will send retro-actively, but only the most recent configured threshold.
If the "Pay Now" feature is also enabled, clients can directly pay invoices from these Past Due Notices, without login!
The email will send to a company's Default Contacts  , and honor any organizations on the Customer Exclusions.

Customer Exclusions
Some email types such as Account Summary, Upcoming Payment Summary, and Invoice Due Notices allow you to exclude specific organizations from receiving the email. This is useful if you prefer a particular client or set of organizations to never receive a "Past Due" Notice, but they still should have an Account Summary.
To add organizations to an exclusion list:
- Choose the Customer Exclusions option for an email type
- Search for a company name and choose a matching company to add them to the exclusions list
- Remove an organization for the exclusion list by choosing Remove
*Each exclusion list is distinct to the given email type it is under, and therefore needs to be individually maintained.
Editing Email Content
Organization emails can be customized to reflect your company’s brand and messaging. Areas of the email that can be customized include:
- Subject Line
- Title
- Header Content
- Footer Content
To edit an email, choose the “Edit” option next to the email you wish to customize. Each content area supports the use of tokens which you can use to personalize email content. A token is a label that is replaced with dynamic data when the email is sent. For example, when displaying your company information, organization information, or transaction data.
To insert a token, choose Insert Token in the text area and pick a token. The token will insert into the text area and the preview area will update to show an example of a replaced token. Once you’re happy with with your email customization, Save the changes. Choose Send Test to send a test email to yourself or other email addresses. The emails sent for the test use the same sample information from the email preview to populate the email content.